Badfeather Knives
“Raider Creek”
“Raider Creek” Specifications
Knife assembly – length: 7.07″ (180.0mm)
Knife assembly – height, highest point: 1.12″ (28.4mm)
Knife assembly – thickness, widest point: 0.58″ (14.7mm)
Blade length, full open: 3.0″ (76.2mm)
Blade/tang thickness: 0.110″ (2.8mm)
Total weight w. titanium handle: 0.33lbs (150.0g)
Blade/tang material: CPM – S35VN stainless steel
Hardness: 59-61HRC
Handle material: Titanium alloy (Ti-6Al-4V, aka “64Ti”)
Lever Bolt, Lever Nut, and Lock Nut material: SS420
– patents pending
READ ALL INSTRUCTIONS before using knife
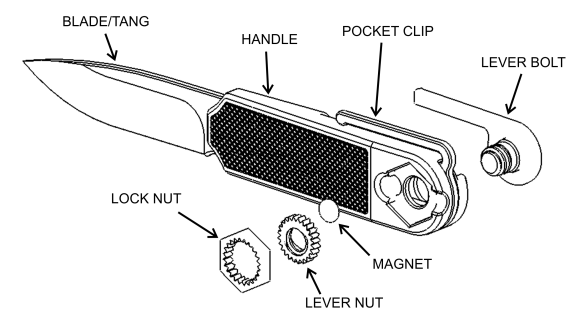
The “Raider Creek” everyday carry (EDC) is a full-tang
pocket knife that utilizes its handle as a sheath in a
unique design that avoids the joint of a folding knife.
The blade may be locked out at any length. A total of 6
parts make up the “Raider Creek” (see exploded view,
above).
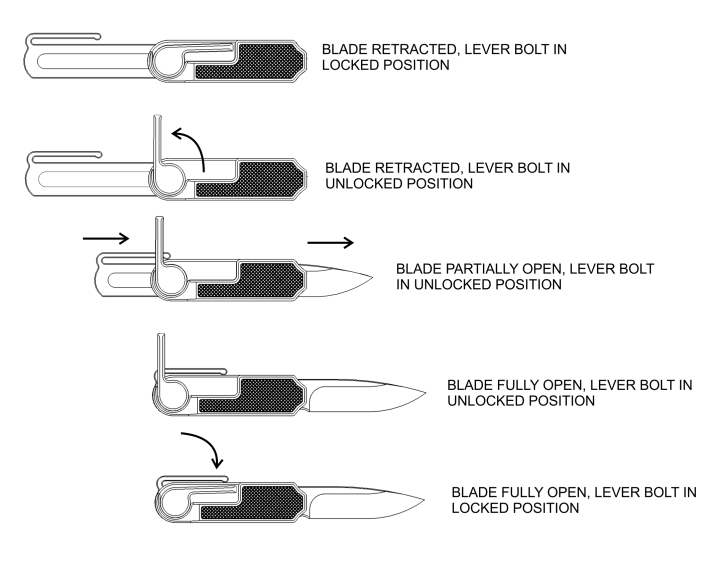
See the pix (immediately left) for a description of how
the knife opens and closes. The blade can easily slide
out the front of the handle when unlocked – make sure
your hand is out of the way. You’ll want to insure the
blade is securely locked when in use, and fully
retracted and locked when it goes in your pocket. It
might take a little practice to open and close the knife
with one hand.
This knife may be field-stripped without tools for
cleaning.
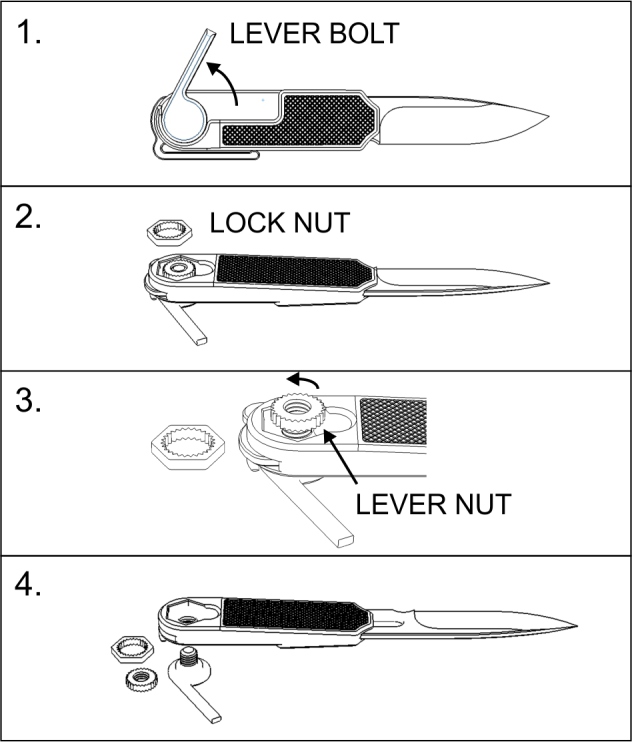
To Disassemble
1. Unlock blade by turning Lever Bolt counterclockwise.
2. With Lever Bolt released, partially extend the knife’s Tang
out the back of the handle; orient the knife so Lock Nut is
facing downward; gently tap the end of the Tang on a hard
surface like a table or log. The Lock Nut will pop out. Don’t
lose it!
Alternatively, you can use a strong magnet to pull the Lock
Nut out of the handle recess.
The combination of 1) the Magnet, and 2) the Lever Bolt
being cinched down is what holds the Lock Nut in place while the knife is in use.
3. With Lock Nut removed, un-screw (turn counter-clockwise) the Lever Nut from the Lever Bolt.
4. The Lever Bolt can now drop out, releasing the Blade/Tang from the Handle.
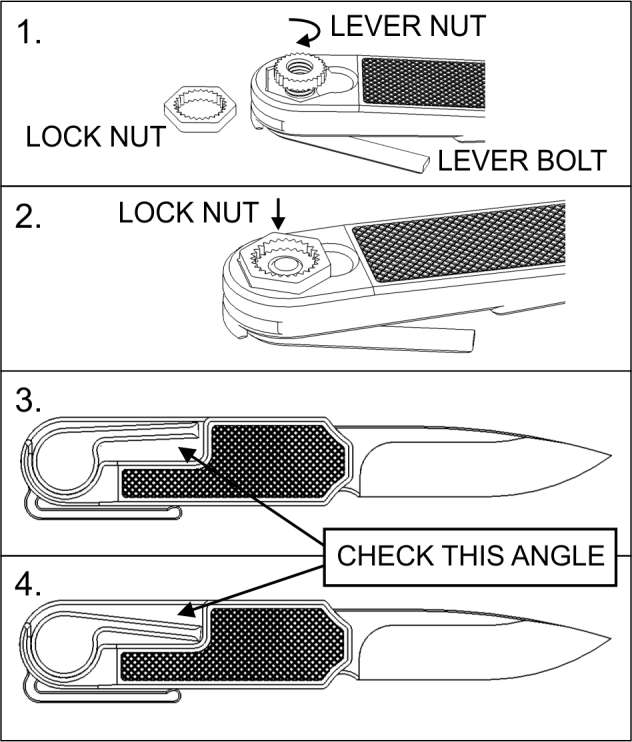
Adjusting Lever Bolt Tightness
1. With Lock Nut off and Lever Bolt partially unlocked as in
the picture at right, finger-tighten Lever Nut.
2. Keeping the Lever Bolt at partial closure as in Picture 2,
and with Lever Nut finger tight, drop the Lock Nut into place to hold the Lever Nut in position. A neodymium magnet, permanently attached to the Handle, holds the Lock Nut in place, as will the locking effect of the Lever Bolt.
It might take a little practice to learn just where to position the Lever Bolt when you tighten the Lever Nut and drop down the Lock Nut.
3. A properly adjusted Lever Bolt, when fully tightened against the Blade/Tang, will be at an angle similar to the angle of the Lever Bolt in Picture 3.
4. If the Lever Bolt is able to be cinched too far to the end of
its movement range, as in Picture 4, it won’t hold the blade
securely. Re-adjust so the Lever Bolt cinches at an angle
more similar to that shown in Picture 3.

TIPS
- Learn how to adjust the Lever Bolt (as
described above) and get used to locking
it down securely (with blade retracted, of
course) before you put the knife in your
pocket. Think of the Lever Bolt as your
knife’s parking brake. - Put a drop of light machine oil on the
Lock Nut/Lever Nut assembly after
cleaning and sharpening, and wipe the
knife down with a clean rag. - Some people prefer the Lever Bolt to
open downward relative to the blade’s
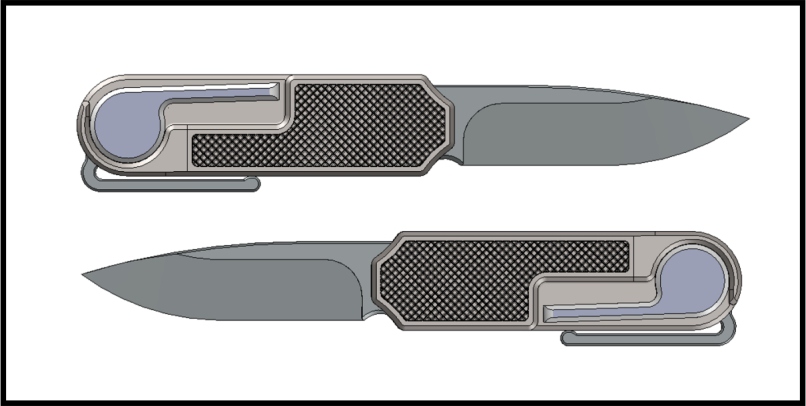
spine. In the picture immediately left, the
upper assembly shows Lever Bolt Up,
and the lower shows Lever Bolt Down. - Badfeather intends to offer replacement
blades, and/or blades made of
alternative steels to fit the “Raider Creek”
and other knives we design. Stay tuned.